Here is the project brief:
You have been awarded the assignment to render an exterior view of a dream home or an interior view of an idealized loft studio apartment in line and tone using ink on drawing paper. The objective of this assignment is to create a dynamic perspective illustration of your dream home. Treat this illustration as an opportunity to explore architectural details that you would like to include in a home. If you choose the loft apartment idea, consider all the important elements you would like to include and how they would appear in one/two point perspective. If you chose to render an exterior view of a dream house, consider the style of architecture and the features that you want and how they would appear in one/two point perspective. There is no type element.
The illustration dimensions are proportional to 14”x 10 and you can render the art at this size. This will be a horizontal format. The art can be rendered on drawing paper or illustration board. Use illustration board if you are going to include watercolor washes.
The Process:
- Start by searching for images homes or interior spaces that you find interesting and inspiring. Try a Google search of interior design sites or sites that feature exterior homes.
- Save images on your computer or a flash drive and print out a copies to use as reference for drawing.
- Render a set of quick thumbnail sketches in perspective that incorporate the elements you find desirable in the reference images.
- Create an original drawing in one or two point perspective using your triangle or French curve as needed. This drawing will be submitted for approval to the instructor.
- Create a rendering on illustration board or paper based on the approved drawing.
- Crop and mount the finished illustration on black matte board and submit for grading.

Assignment 2: Demonstration
Ink Drawing Assignment - Initial Drawing in One Point Perspective
The first step in any illustration assignment is to create an accurate drawing of the subject before rendering the art. In the case of an ink drawing where some precision is required, take extra time to indicate details accurately. This house is illustrated in one point perspective and was not substantially altered from the reference.
For your illustration you want to create a dream house or interior loft environment from scratch, using reference of elements that you want to incorporate into the illustration.
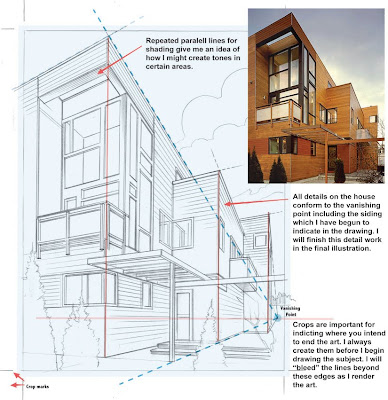
When you begin to conceptualize the scene, start by identifying the vanishing point for the subject before drawing the structure. In the sketch on the next page, the top edges of the house and the foundation are marked in blue to locate the vanishing point. The second vanishing point for the left side of the house exists in space but is not shown. In this case I followed the reference closely and did not feel that I needed to extend the lines out to the left vanishing point.
Several points to note on the illustration below include:
1. Crops are important for indicting where you intend to end the art. I always create them before I begin drawing the subject. I will “bleed” the lines beyond these edges as I render the art.
2. Repeated parallel lines for shading gave me an idea of how I might create tones in certain areas.
3. All details on the house were made to conform to the vanishing point including the siding which I have begun to indicate in the drawing. I will finish this detail work in the final illustration.
- Crops are important for indicting where you intend to end the art. I always create them before I begin drawing the subject. I will “bleed” the lines beyond these edges as I render the art.
- Repeated parallel lines for shading give me an idea of how I might create tones in certain areas.
- All details on the house conform to the vanishing point including the siding which I have begun to indicate in the drawing. I will finish this detail work in the final illustration.
Ink Drawing Assignment – Beginning to Render the House
Once the pencil drawing was complete it was time to begin inking in the major details of the building. I inked the edges of the building and the major shapes like window frames. I added solid black areas in the windows to indicate reflections and dark tones on the bushes using a Sharpie.

There are several more points to note on the drawing pictured above:
- Use your triangle or the straight edge of your T-square as much as possible to create straight edges in your ink drawing.
- Locate major dark shapes in the subject and fill with black using a Sharpie.
- You can use cross hatching to create mid-tones.
Ink Drawing Assignment – Finishing the Illustration
The last stage of the process involves adding details and tones. You can see in the transformation from the partially completed inking to the final illustration how I cropped into the image to clean up the edges by eliminating the “bleed”. I also added a lot of shading by using parallel lines. These areas always fall on the shadow side of the house which faces toward us or in areas where the corners of the house cast shadows across the siding. I added cross-hatching to the front doorway and more dark areas in the windows.

There are several more points to note on the rendering above:
- Use your triangle or the straight edge of your T-square as much as possible to create straight edges in your ink drawing.
- Locate major dark shapes in the subject and fill with black using a Sharpie.
- You can use cross hatching to create mid-tones.
Watercolor or Acrylic Washes:
If you are thinking of adding watercolor washes to the image, there are two approaches that can be taken.
1. Think about adding thin washes of tone to limited areas before and during the inking process. Remember to test the ink pens you have selected to make sure the lines won’t bleed when a wash is added.
2. Think about adding a thin coat of clear acrylic matte varnish over the line rendering first. This coat will seal the art and allow you to experiment with adding light watercolor washes without destroying the line art.
A demonstration will given on how to apply washes.
No comments:
Post a Comment