After you have finished the drawing of the simple room and the still life drawing I would like you to proceed with a shaded grouping of overlapping objects. They can be as simple as indicated below or you can add actual objects to the group. The grouping below is only an example. In this case you will shade the objects by first determining a light source. This decision will determine which side of each object will be shaded and the direction of the cast shadows.
A. First, layout a basic drawing of the objects as transparent shapes making sure they all conform to a common vanishing point. Try to position the closer objects in front of the more distant objects so they appear close together as a group.
Make sure there is enough space between objects by drawing the back sides of each form. This will prevent objects from invading each other’s space.

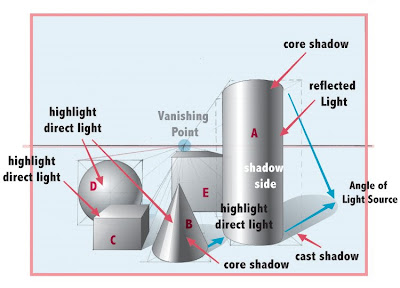
B. Determine the angle and position of the light source. This involves deciding the direction and height of he light source. It is important to make the shading consistent on all the objects. It is also crucial to make the angle of the cast shadows consistent which means they must fall on the same angle. This means the length of the shadows should be in proportion to the height of each object and fall at a similar angle as shown below.
C. Once you have determined the angle and direction of the light source you can then begin shading each form with graphite pencils.
Make sure the highlights face the same direction on each object. Core shadows always fall on the opposing side of a dimensional form.
No comments:
Post a Comment